
I was searching for a simple backup solution in Linux system that could serve in block-level backup and for disaster recovery as well, and yet simply cost effective. Now-e-days, one could see a lot of options, however, I wanted to try out simple and yet native Linux solution, so, I came across this "dump & restore" utility. This may not be an ideal solution for a larger network, but one could leverage on this for smaller network wherein there is no tight schedule on recovery. So, I thought of creating a step-by-step document of the same.
Complete system can be backed up and restored using native Linux commands “dump & restore” which would facilitate backup or disaster recovery process.
What are “dump” & “restore” commands?
The “dump” would capture data files and would be restored using "restore" command.
As per the man page of dump command:
Dump examines files on an ext2/3/4 file-system and determines which files need to be backed up. These files are copied to the given disk, tape or other storage medium for safe keeping.
The restore command would restores the files copied via dump command.
Let's demonstrate on how to backup and restore system data
There are two stage with this process, one is backup system data using 'dump' command later restore the data using 'restore'. For demonstration purpose, I'm going to destroy the partition table and restore here. So, let's see how we could do this now.
Some Points
Since this only records and restores data, one must take care of disk layout and corresponding UUID or labels and should manually create it (in case of disaster recovery). This would be shown later in this document.
Build Environment
I’m using a VM (Virtual Machine) for this test and documentation purpose. This VM is installed with RHEL 6.8 running in Workstation 11.
This VM has got 2 hard drives (sda & sdb). The root file system is installed on '/dev/sda2', boot on '/dev/sda1' & swap file system on '/dev/sda3' partitions as shown below:

The other partition '/dev/sdb1' is being used to store disk dumps (backup data).
The virtual system details :

The “/etc/fstab” file details:

Plan
Here, I’d take disk level backups of partitions '/dev/sda{1..3}' (using dump command) on which my root file system resides, and store the dumps on '/dev/sdb1' partition. Later, destroy the partition table of '/dev/sda'. At this stage, system would fail to boot since there is no partition table (no MBR data). Hence, restore dump data after creating proper partitions on '/dev/sda'.
Points To Consider Before Proceeding
- Make backup of partition details, the ‘/etc/fstab’ file, blkid output and other details as required before destroying partition table which makes system not bootable.
- It is good to run “SOSREPORT” (in RHEL variants) and save complete system configurations on external device.
- Partition-wise layout detail is required for re-creating partition table while restoring.
- Also, make a note of the file system UUID or label whichever relevant.
- In case of LVM based file systems, need to backup '/etc/lvm/archive' file which could be used to re-create required pvs, vgs and lvs.
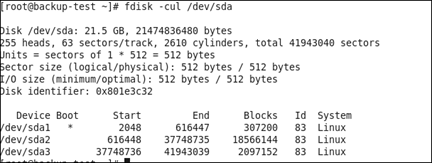
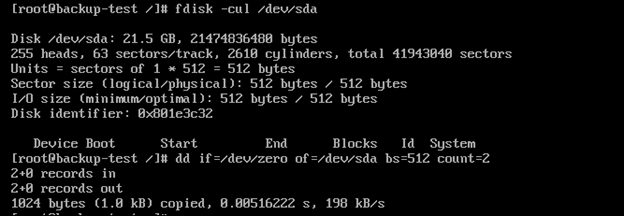
A snap of “fdisk -cul /dev/sda” :
A list of file system’s UUIDs associated:

That being said, let’s start executing the plan.
Step 1: Dump partition wise data
Now, let’s backup each partition wise data using “dump” command. In our setup, we’d need to backup data from '/dev/sda1' (boot file system) and '/dev/sda2' (root file system) only, and '/dev/sda3' is a swap partition hence it could be skipped.
- Boot the system into single user mode.
- Use the “dump” command to backup data from '/dev/sda1' & '/dev/sda2' partitions as shown in below screen image (this dump is stored on the block device '/dev/sdb1'):


Dumping data would depend on amount of data actually stored on block device. In the above (test-setup) example, it took almost 5 minutes to backup '/dev/sda2' (root file system).
The details of the backup is as shown here :

Notes:-
-> If the system has been running for a long time, it is advisable to run 'e2fsck' on the partitions before backup.
-> “dump” should (may) not be used at heavily loaded and mounted filesystem as it could backup corrupted version of files. This problem has been mentioned on dump.sourceforge.net and Red Hat Manual
If required, backup could be stored on remote systems as shown below. In general, backup files should of course be stored in a different location.
# dump -0u -f - /dev/sda1 | ssh root@remoteserver dd of=/tmp/sda1.dump
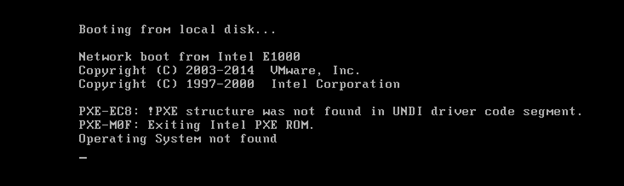
- Now, lets delete the partition table of '/dev/sda' device which would make system non-bootable:
- After reboot the system failed to boot up and received an error “Operating system not found”.
Step 2: Backup Process
Since system failed to boot, I tested system by booting from rescue image and when tried to identify Linux partitions it failed to detect (as shown below) :-
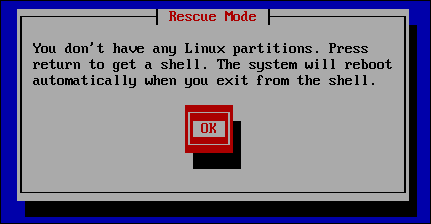
Deleting of the partition details has nullified MBR (Master Boot Record) and hence the above error.
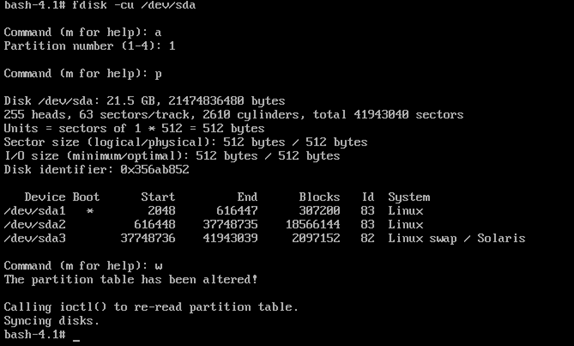
The first step in restoring the system is to create disk layout as necessary. So, lets create partition layout exactly as it was before in rescue mode on hard drive “sda”.
Creating the '/dev/sda1' partition:
Need to create the first partition which is for boot file system and this would require the starting sector in bytes and end sector as shown (creating exact layout as it was before):

Same way, I've created '/dev/sda2' partition (root file system) as well and changed the partition ID of '/dev/sda3' as swap.

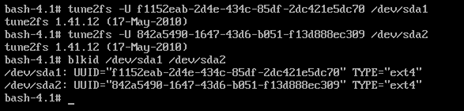
At this stage, it is required need to create the file systems on the newly created partitions. Since '/dev/sda3' is being used for swap, let’s run “mkswap” with same UUID as it was before as shown below:

Likewise, need to change the UUID of '/dev/sda1' and '/dev/sda2' to the original UUID as it was before by referring to the backup data that we had taken earlier. To get this done, “tune2fs” command can be used as shown below:
- Next step is to toggle the boot flag and mark '/dev/sda1' as boot partition.
NOTE:- If the data is not corrupt then there is a high possibility of recovering without running mkfs.ext4 command on each partitions (boot & root). Yes, one could run "setup" command as explained below on boot device/partition and try booting the system to check if it comes up. If the damage was only to the partition table then system would be able to boot up, if not then need to create file system and then restore from backup on each block device.
- Now, let’s mount
'/dev/sda1' on '/temp1',
'/dev/sda2' on '/temp2' &
'/dev/sdb1' on '/backup-data' as shown in the below snap ( check if there is any data in '/temp1' and '/temp2' mount points. There should not be any since these are new file systems):

The files under '/backup-data' folder are 'sda1.dump' & 'sda2.dump'. These files are the backup copies of '/dev/sda1' and '/dev/sda2 ' partitions.
- Let’s restore data from dumps using “restore” command in rescue environment. So, switch the current directory to '/temp1' which is for '/dev/sda1' and then run 'restore' command as shown below to backup boot file system:

- Same way switch the current directory to '/temp2' which is for '/dev/sda2' and then run 'restore' command as shown below to backup root file system:

- After this, system yet failed to boot up and thrown up same error message as before “Operating system not found”. This could happen because of missing MBR data on primary hard drive.
- Mount boot partition on a temporary mount point and check for 'device.map' file under grub directory.

Run the 'grub' command by sourcing “device.map” file as shown below which would drop into the 'grub' prompt. Identify the root file system disk and run 'setup' command which would install missing MBR and corresponding files over there:
Command: “grub --device-map /temp1/grub/device.map”

After this exit the shell and reboot the system. The system should boot up fine.
That’s all!!!
NOTE:- If the underlying block devices are logical volumes (lv) then need to create physical volumes using UUID referencing to archives stored under /etc/lvm/archive folder, likewise need to create same volume group (vg) and lvs. Saying so, there is a need to backup /etc/lvm contents.
References:-
20 comments:
very well useful information that you have provided in your website, which shares more knowledge among allGreat information
Um, unmount might have been an omitted step ? Don't you need to unmount the target ?
Hats off man very very nice info.
Howdy! I'm at work surfing around your blog from my new iphone 3gs!
Just wanted to say I love reading through your blog and look forward
to all your posts! Keep up the superb work!
all the time i used to read smaller articles that
also clear their motive, and that is also happening with this piece of writing which I am reading now.
Hello, Neat post. There is an issue with your site in internet explorer, could
check this? IE nonetheless is the marketplace leader and a large component to folks will omit your fantastic writing because of this problem.
Hi, I've checked in IE and it works fine.
It's a pity you don't have a donate button! I'd
most certainly donate to this outstanding blog! I suppose for
now i'll settle for bookmarking and adding your RSS feed to my
Google account. I look forward to brand new updates and will talk about this website
with my Facebook group. Talk soon!
Thanks so much for liking my blog... You may follow me in Google+ and blogger site, and hit Like button. Yes, certainly I will publish new troubleshooting and how-to' soon....
This excellent website definitely has all of the information and facts I wanted about this subject and didn't know who to ask.
Hey SimplyLinuxFAQ , awsome post
I was wondering if I save the dump.gz file to a remote server and install a new OS version ( lets say rhel 5.11 currently and install 6.9 ) , how can I use that dump file to restore all the settings I previously had ?
Does major RHEL OS versions can have conflicts while restoring ?
Thanks in advance ,
Hi,
The "dump & restore" does a block level backup and restore and doesn't backup any system settings such as partition details, file system details so on, hence, if you are looking for such a solution which for purpose of DR then you may have to look out for ReaR, Clonezilla, Mondo etc.,,,
Good article. I'm facing a few of these issues
as well..
naturally like your web-site but you have to take a look
at the spelling on quite a few of your posts. A number of them are rife with spelling issues and I to find it
very bothersome to inform the truth however I'll definitely
come again again.
Thank you, I'll certainly take a look at it and would fix those...
Well stated, you have furnished the right information that will be useful to everybody. Thank you for sharing your thoughts. Security measures protect your company not only from data breaches, but also from excessive financial losses, a loss of people's trust, and potential risks to brand reputation and future benefits.
IT infrastructure services
Cybersecurity Service Provider
Excellent Blog, A must read.
backup and disaster recovery
Excellent Blog, A must read.backup disaster recovery
Thank you for sharing this informative article on using the "dump" command for creating and restoring Linux system data. Data backup and recovery are fundamental aspects of system administration, and your article provides valuable insights into one of the methods available for accomplishing this crucial task.
The "dump" command is a powerful tool for creating backups and is particularly useful for Linux system administrators. Your detailed explanation of the command's syntax and options, along with step-by-step instructions, makes it accessible even for those who might be new to Linux.
Overall, your article is a valuable resource for Linux enthusiasts and system administrators seeking to enhance their data management and backup skills. Thank you for sharing your knowledge and expertise in this area. Keep up the excellent work!
If you are in search of Linux Web Hosting, don't forget KemuHost.
The article on creating and restoring Linux system data using the "dump" command is a valuable resource for VPS administrators. This powerful command can be a crucial tool for managing and safeguarding data in virtual private server (VPS) environments, offering enhanced data integrity and recovery capabilities. Mastery of the "dump" command is essential for VPS administrators looking to maintain the reliability and resilience of their virtual servers while ensuring data protection and minimizing potential downtime.
Post a Comment