
 “Rear” (Relax-and-Recover) fits perfect in implementing a bare metal disaster recovery solution & image migration as well. Rear is the leading Open Source disaster recovery solution. It is a modular framework with many ready-to-go workflows for common situations.
Most backup software solutions are good at restoring data but do not support recreating the system layout. Rear is good at recreating the system layout but works best when used together with supported backup software. In this combination Relax-and-Recover recreates the system layout and calls the backup software to restore the actual data. Thus there is no unnecessary duplicate data storage and the Rear rescue media can be very small.
There are a lot of articles or documents available about Rear, hence, this documented I created is for my reference, but available publicly, so if anyone finds it helpful then I'd say "I'm glad", and please don't forget to hit Like button or leave a comment.
As per “Red Hat” it is officially supported from RHEL7.2 on-wards, however, relax-and-recover web site got rear packages for RHEL5/6 as well. I was able to trace “rear” package in the ISO image of RHEL 6.8 version. With this solution "system admins" should be able to recover a failed system with minimal downtime. Saying so, “ReaR” is not a backup solution rather it is a recovery solution. Hence, external precautions and procedure should be followed up to take data backup.
There are two main steps involved in this process:-
:: Backup system
:: Recover system
Let’s see how we could ‘backup’ and ‘recover’ system using rear now.
Scope: This document is mainly for Linux systems and intention is recovering a failed system, again, not a backup solution.
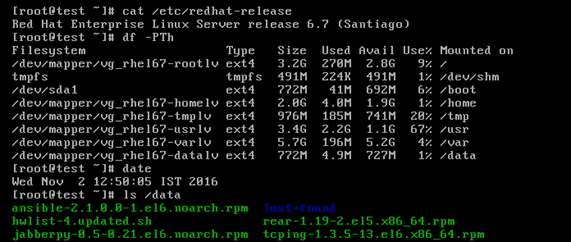
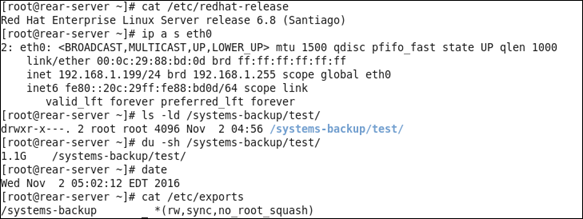
Testing Environment: This solution is tested on RHEL 6.7 virtual system running in VMware Workstation 11. Backup of the system image would gets stored on RHEL 6.8 virtual system in same network which is the Rear server. The NFS protocol is used to get the rear images/files transferred from client to rear server and for recovery as well.
Step 1: Backup System
In this step, I’m going to take system backup using “rear mkbackup” command. This is a test VM (virtual machine) which I’d destroy later and then try to recover using “rear” solution which would be explained in step number 2.
- A snap of the test system:
- Install the “rear” package if not installed yet.
The 'rear' package is available in the standard server repository channel. If someone is using older version where it is not available in standard repository then the below link could be used to download the package:
- Once installed, need to edit '/etc/rear/local.conf' file and make necessary changes to tell the system about backup method being used, backup server etc. So, I’ve made the changes to this file as shown below:-

Here, the backup would create a bootable ISO image file in the format "rear-$(hostname).iso", and it is using default “NETFS” backup method (internal archive method being used by rear), and finally the backup files including the ISO files are stored on the remote system as mentioned in the parameter “BACKUP_URL” via NFS protocol. This option is mandatory when backup method is specified as “NETFS” (make sure NFS service is up and path is set on the rear backup server properly,).
Refer this link for more details on the other options:-
- Let’s start making backup of the system now. At this stage, we are ready to run the command “rear -v mkbackup” to start making backup of our system as shown below:-
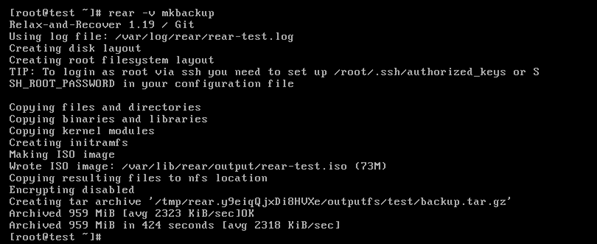
Depending on the amount of data to be taken as backup and network speed, it would take some time to complete. When checked on the server where this backup is stored, found that the total size of backup was 1.1 GB as shown (this size would vary from system to system):-
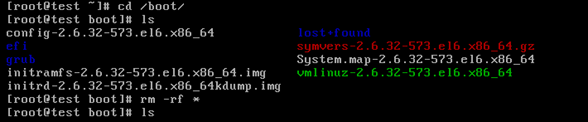
- Now, I'd delete the boot files from '/boot' partition of this system "test" to make it fail on boot.
- After the reboot, the system dropped into grub shell and unable to boot up. Since I had removed all the boot files it is difficult to get those files backup, hence, I’d need to restore using “rear” now.
Step 2: Recover Failed System
At this stage, I’d need to boot the failed system using the bootable ISO file that was created in the earlier stage. So, let’s mount this ISO image and boot the system. When checked on my system this file was size of 73 MB as shown here:-

Boot the system with this ISO file. Once systems comes up, screen should look similar to this one:
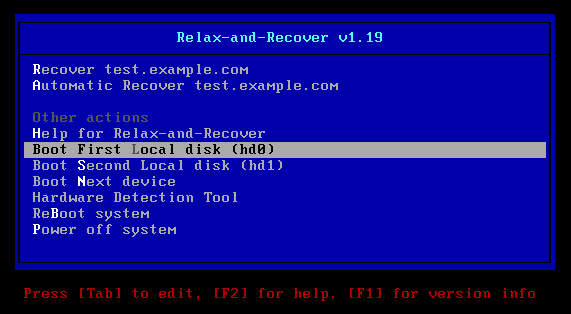
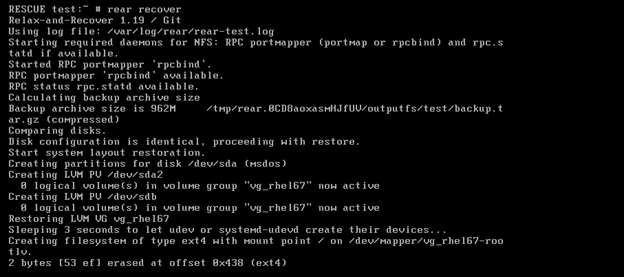
- So, go ahead and select “Recover test.example.com” and hit enter to start the recovery process ( selecting 'Automatic Recover' would also work ). This would check and build the necessary layout for the system and drops into rescue shell.
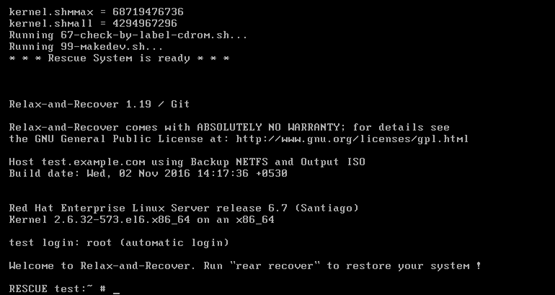
At the shell, need to run the command “rear recover”. After a few minutes, systems failed to recover and shown the below error message:-
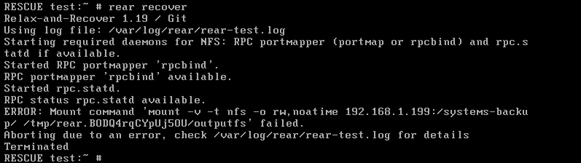
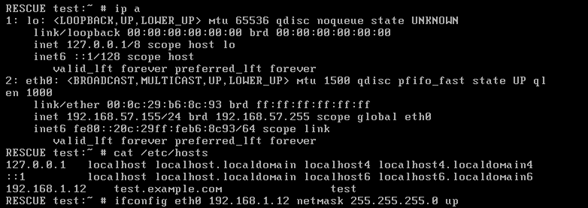
When checked and I found that it was because dynamic IP assigned to this system running in rescue, hence, I changed it to static IP after which I was able to recover successfully.
Starting recovery…….
End of recovery…..
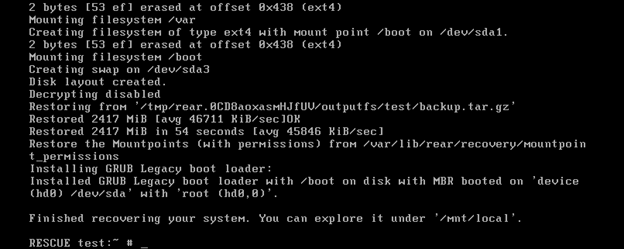
At the prompt type “reboot” and system should be able to reboot without any errors. File system re-labeling would kick off if SELinux was enabled.
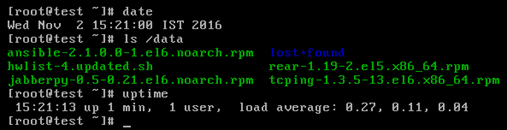
Once system is up, those files that I had stored under /data was there as before:-
That's all :)
10 comments:
Exactly.. disaster recovery amazon
is highly available and scalable internet storage which is designed to concurrent loss of data in following facilities including buckets and has web service API’s to allow for S3 interactions.
can you please provide steps for mounting the iso file and booting the system with the iso file? having a really hard time with this.
Thanks in advance
You can't boot from an ISO image mounted on running system, if you really wish to use the same image to boot then move the image out of the system and then boot from it. Please explain in more detail what you wish to accomplish here. Send your query with details to this email address : simplylinuxfaq@gmail.com
nice information,
Thanks and best regards: Software development company
its really good source of information as after reading this post i come to know about this story.....Managed IT Services
This blog provide great information on disaster recovery examples and share a nice plan. Thanks for sharing.
Hi there! This is my 1st comment here so I just wanted to give a quick shout
out andd tell you I truly enjoy reading through your blog posts.
Can you recommend any other blogs/websites/forums that deal with thee same topics?
Thanks for your time!
hey.. this is good and well documented.
Thanks
Thanks, a life saver!
Post a Comment