
One of my Linux servers (RHEL 7.5) dropped into grub rescue shell and had failed to load the operating system. So, I was troubleshooting it and discovered a few steps which could help anyone who is in need, hence, I decided to write this post in my blog site. This post talks about step by step procedure to recover such a Linux system and boot normally. This is tested and re-produced on a virtual system running on VMWare Workstation.
I’m going to document each step with screenshots in this post which would help anyone who wish to recover such failed system.
System Environment
This system is installed (RHEL 7.5) with one drive “/dev/sda”. The boot file system is on standard partition “/dev/sda1” & root file system on a lvm “/dev/mapper/rhel-root” for which “/dev/sda2” is the back-end physical volume as shown:

Let’s replicate the issue
This is a working setup and to replicate the issue what I did was that I mirrored data from "/dev/sda1" into "/dev/sdb1" and respective changes done in "grub.cfg", "device.map" file and then did a reboot. Everything worked as expected, "/boot" is on "/dev/sdb1" now.
Later, I destroyed the meta data held on "/dev/sda1" by running "pvcreate /dev/sda1", then rebooted the system. Now, the system fails to boot and drops into grub rescue shell as shown:
Later, I destroyed the meta data held on "/dev/sda1" by running "pvcreate /dev/sda1", then rebooted the system. Now, the system fails to boot and drops into grub rescue shell as shown:

Let’s demonstrate on how to fix it
Usually a system drops into ‘grub rescue shell’ when it doesn’t find required grub configuration files after MBR, or if the block device holding grub files formatted by mistake or if the files associated with secondary stage boot loader got corrupted. So, the system has successfully passed first stage and MBR is intact, however, secondary stage boot loader is missing or corrupted.
The "grub rescue" shell is a minimal interface with limited commands that would work. Commands such as "cat", "find" and other commands which normally work in a grub shell would not work here. So, how to fix this?
Step 1
In the 'grub rescue shell', locate the primary boot device using "set" command and if this is not correct then fix it. In our case, when I ran "set" it was pointing to "hd0,msdos1" which is the first partition on the first hard drive which is not the boot device. Find out the available block devices and partitions using "ls" command as shown:

As you could notice, there is another block device available which is "hd1" with one partition on it which is the correct boot device.
Step 2
At this stage, we’d need to set the root device (root device means boot device here) and prefix as well. So, run the command "prefix=(hd1,msdos1)/grub2" and "root=hd1,msdos1" as shown in the below snap. Once this is done, run "ls $prefix" and the output should actually show the files under grub2 directory of the underlying block device "/dev/sdb1":
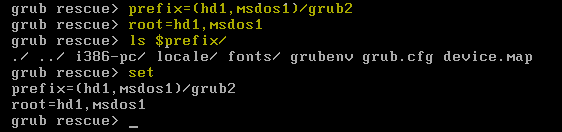
Also, run the command "set" to see if correct boot device is set and prefixed.
Step 3
We’d need to load "normal" and "linux" modules to make sure that GRUB loads properly. This is done by running the command (refer the below screenshot):
grub rescue> insmod normal
grub rescue> insmod linux
These modules would help us to read configuration files, understand kernel and initramfs files so that we could bring up the system. Once the above modules are loaded type "normal" and hit Enter key which would spin out a new grub shell where we could execute larger range of commands to boot the system.

Step 4
At this stage, we could select required kernel and hit enter key. Check if this helps to bring up the system. If this fails then we’d need to hit "c" to get into grub prompt from where we could manually load required kernel and initramfs images and boot the system.
Once the "grub>" prompt is up, list out active partitions and block devices using "ls" command. We could also find out which is a boot device by using "ls" or "cat" command as shown:

Step 5
Let’s load the kernel using "linux16" command. Before that we’d need to identify available kernels and this could be achieved while running "linux16" command as it would back-fills available parameters automatically. Otherwise, we could type "ls (hd1,msdos1)/vmlinuz" and hit tab key to find out matching options. Then run the "linux16" command with correct kernel and root device system as shown below to load it. In my case, I’ve typed below command and hit enter (after typing ‘vmlinuz’, pressing ‘tab’ key would auto-populate options):
grub> linux16 (hd1,msdos1)/vmlinuz-3.10.0-862.el7.x86_64 ro root=/dev/mapper/rhel-root

Step 6
Next step is to load ‘initramfs’ image file at the grub shell prompt. We’d could do this by running "initrd16 (hd1,msdos1)/initramfs" and hit tab key to see a list of available initramfs image files. Then enter the correct "initramfs" image file or we could get it auto loaded as shown below:
In my case, I’ve typed below command and hit enter (after typing ‘initramfs’, pressing ‘tab’ key would auto-populate options):
grub> initrd16 (hd1,msdos1)/initramfs-3.10.0-862.el7.x86_64.img

Step 7
We are almost done in bring up the system. So, finally, we’ve to run the command "boot" and hit enter at the grub shell so that system would boot up properly.
That’s it. The system is up now. Finally, need to run "grub2-install /dev/sdb" which could install grub on the boot device so that next time when system reboots it would come up without any issues (as per the boot device that is set). NOTE: In case of earlier RHEL version such as RHEL6.x, we could run "grub-install" to get the same job done.
10 comments:
Nice blog with excellent information. Thank you, keep sharing. Python Online Training
Great tutorial. Looking forward to use it.
Needed to compose you a very little word to thank you yet again regarding the nice suggestions you’ve contributed here.
fire and safety course in chennai
Thank you so much for such valuable information sharing. It’s highly appreciated.Interesting and informative article...very useful to me, please keep on updating..
AWS Training
AWS Training in Chennai
Thanks for the good words! Really appreciated. Great post. I’ve been commenting a lot on a few blogs recently, but I hadn’t thought about my approach until you brought it up.
Best Devops Training in pune
Devops interview questions and answers
Good one...
Amazing Post . Thanks for sharing. Your style of writing is very unique. Pls keep on updating.
Best Spoken English Institute in Chennai
You are an amazing writer. The content is extra-ordinary. Looking for such a masterpiece. Thanks for sharing.
IoT Training in Chennai
Hi,
Good job & thank you very much for the new information, i learned something new. Very well written. It was sooo good to read and usefull to improve knowledge. Who want to learn this information most helpful. One who wanted to learn this technology IT employees will always suggest you take data science course training bangalore. Because data science course in Bangalore is one of the best that one can do while choosing the course.
Post a Comment