
 There are many a times that we’ve come across this situation where an “hard drive partition table has been erased accidentally” or “partition data is missing or corrupted” and hence, unable to mount respective block devices. Yes, “how to recover or repair corrupted or deleted partition table of a hard drive” or “how can I recreate hard drive partition table without losing data” are some of the keywords that we hit on Internet to find out a solution. There are a few third party tools (many from open-source) available which could get this job done, however, I wanted to show how this could be done using native tools/commands in Linux operating system. There are at times that we could not use those third party tools, hence, we’ve to go with native way of restoring partition table data. So, let’s see how could we get this achieved. NOTE: If a hard drive is extremely damaged (physically) or if it is re-formatted (making a file system) or if meta-data itself is gone corrupted or severely damaged then there are very less chances of recovering data, in such cases users may have to rely on some sophisticated third party tools which may recover some or part of data. The situation that I’m going to cover here is wherein a hard drive partition table is erased, however, no re-formatting has been done yet.
Before we could get into the act/demonstration of restoring hard drive data, let’s understand a few facts about hard drives and how data gets stored.
How does a disk (hard disk/drive) is designed to hold data?
A hard disk or drive, be it a SATA (Serial ATA), SCSI (Small Computer System Interface), SAS (Serial Attached SCSI) etc, would normally resemble thin disk plates mounted on rotating disk spindle with read/write heads attached, which represents a high level architect view of a hard drive except SSD (Solid State Drive) where architecture is different. Each of such disk plates which are circular in shape gets divided into smaller tracks (ring) and again divided into sectors. A sector is the smallest data unit segment.
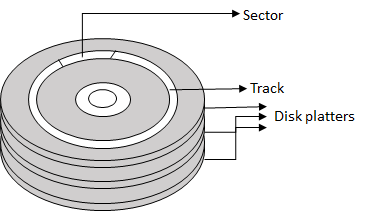 Here is a small cut-out internal diagram of a hard drive which shows how disk plates are stacked one above another. Each disk plate would get divided into tracks, sectors which gets accessed by read/write heads for each plates.
So, the data gets stored on hard drives in blocks and which is accessed by read/write heads by referring to Cylinder number, read/write head number, and finally sector number (CHS). This is the most basic method on how data gets stored or retrieved by disk drives. This is also referred as disk addressing methodology. There are some limitations with this method and hence, there is LBA (Logical Block Addressing) mode which being used, and there is GPT (GUID Partition Table) an advanced method which is also available for bigger hard drives. I’m not going to explain all this as this is not within the scope of the subject.
Why do we need to create hard drive partitions and file-systems on it?
A new hard drive without formatting is unusable. What that means is that operating system can’t understand hard drive layout to write/read data. So, ideally one bigger hard drive gets divided into partitions depending on requirements. These partitions would be made suitable for storing data by creating file system layout which the operating system (kernel) can understand and can easily write/read data. In Windows, we would call this as formatting process. This is the standard being followed on different operating systems which are non-Unix as well. NOTE: A whole hard drive could be used without creating partitions when it is used as underlying block device in case of a logical volume. But it is recommended to make a partition with complete size of a hard drive and then use it as an underlying block device for a logical volume which could avoid any tool/program that might mistakenly project the hard drive as being unused.
There is a partition table which is ideally in the first 512 bytes of a drive which holds partition details also referred to as meta data. This partition table is of 64 bytes size which can hold 16 X 4 (16 bytes X 4 partitions) data. Each partition holds details such as starting CHS, total partition capacity in bytes, LBA details etc.,
Ideally a hard drive can hold maximum of 4 primary partitions, to overcome this limit there is the concept of extended partition being used which would be the last primary partition that can hold further logical partitions of 16 maximum. This is in case of BIOS (Basic Input Output System) based system which could understand MBR (Master Boot Record) layout. In case of UEFI (Unified Extensible Firmware Interface) based systems where GPT (GUID Partition Table) being used, there is no such partition limits. Also, MBR could only address a disk of size lesser than 2.2TB.
Does erasing partition table would remove data as well?
Just erasing partition table would never wipe out data on a hard drive. Yes, when a partition table gets corrupted or damaged there is a possibility that we could still recover the partition details. However, there should not any further formatting or damage done to a disk. There are many third party tools available which can still recover data from a badly damaged disk, however, we’d focus only on recovering partition table using native Linux commands/tools here.
Let’s do it!
System Environment:
- This is a Virtual Machine (VM) running on Oracle Virtual Box.
- This system is running with RHEL6.9 and kernel version is “2.6.32-696.el6.x86_64”.
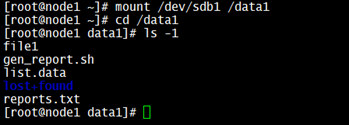
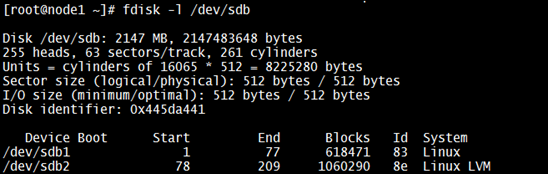
To demonstrate the process of recovering partition table, I’d consider a disk “/dev/sdb” which is the second hard drive with two partitions. The partitions are “/dev/sdb1” which is mounted as a block device for the mount point “/data1” & second partition which is “/dev/sdb2” is being used as block device for a LVM i.e “/dev/datavg/datalv” for which the mount point is “/data2” as shown in below snap:
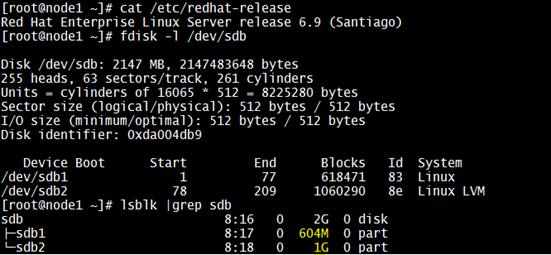
Just for demonstration, I’ve created some files on “/data1” and “/data2”.
Important Points:
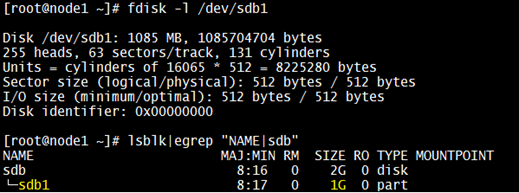
--> A sector is traditionally of 512 bytes, but newer drives comes with 4096 bytes(4K) size. This is the smallest amount of data that can be written to or read from a disk drive by most software. A sector size can’t be altered by operating system and this gets decided by disk manufacturers'. A disk with sector size of 4096 bytes is considered to be having advanced format. This can be viewed using disk tools such as fdisk, parted etc., as shown below:

--> When a partition is formatted by running file system creation then it would calculate certain parameters such as “Block size”, “Block count” etc., The “Block size” which is usually of size 4096 bytes (except for /boot in RHEL6, which remains on 1024 bytes) by default unless modified.

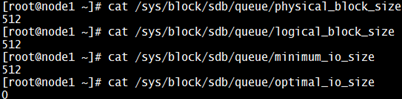
--> The Linux I/O stack has been enhanced to consume vendor-provided "I/O Limits" information that allows Linux native tools (parted, lvm, mkfs.*, etc) to optimize placement of and access to data. There is ‘physical_block_size’ which defines smallest unit on which a storage device operates & ‘logical_block_size’ which is used externally to address location of device respectively. There is also 'minimum_io_size’ which defines the device preferred minimum unit for random I/O & ‘optimal_io_size’ which is the device preferred unit for streaming I/O. These data can be accessed from “/sys” file system as shown below for device “sdb” or using disk utilities such as “fdisk” or “parted”:
--> Any hard drive bigger than 2.2TB can’t be understood by MBR based tools such as “fdisk”, hence, there we’d need to use “parted” tool which is GPT aware, and which is also the default partition layout scheme being used in UEFI based systems. When using GPT scheme, the partition table gets stored both at first and last sectors of a drive, hence, recovering partition data is not that much difficult.
Replicate the problem: Let’s destroy partition table of device “sdb”
I’d be using the “dd” command to nullify the first 512 bytes on the block device “sdb” so that partition table gets erased. However, this would not affect the actual data stored on individual partitions in the device.

Let’s restore partition table
Method 1
Step 1: Identify number of partitions which were created on the device.
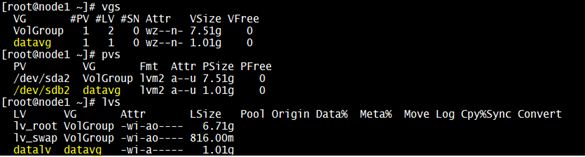
We could understand by reading “/etc/fstab” file that there were two partitions created on “/dev/sdb”. They are “/dev/sdb1” for which the mount point was “/data1” and “/dev/datavg/datalv” lvm for which the mount point was “/data2”.
If system needs a reboot then comment the respective lines in “/etc/fstab”, otherwise system may fail to boot-up and throws up “Ctrl+D error” goes into emergency mode. If mounted details are not available by any chance in “/etc/fstab” file, then we’d need to detect those partitions and recover it.
Step 2: Identify the ‘Block size’ and ‘Block count’.
So, let’s create first partition of any size on “/dev/sdb” and then try to detect “Block size” & “Block count” using the “dumpe2fs” command (need to use xfs_info command for XFS file systems). This partition should be of any size and should greater than the original size of the first partition before it was erased.
In this case, I knew that it was size of 600MB, however, in real-time we’d not know or remember the actual size of partition. So, let’s create a partition of size 1GB first and check.
Now, let’s try to read “Block size” and “Block count” from “/dev/sdb1” using “dumpe2fs” command. We'd try to re-create partition of bigger size and verify the block count and block size and it should not change, if it changes then we'd need to create a bigger partition and verify again. Here, we go:

At this stage, if you could just mount this device and check then we could see that the files that we had created are there, however, this partition is not of the correct size, hence, we’d need to figure out the correct size.
Step 3: Calculate the correct size of partition and re-created it.
From “Step 2” we came to know that the “Block count” & “Block size” are as below:
Block count: 154617
Block size: 4096
So, let’s multiply both and see the total we get in bytes which is “633311232”. Since this value is in bytes, we’d need to convert this into further down into Kilo Bytes (KB), Mega Bytes (MB), Giga Bytes (GB), Tera Bytes (TB)..etc., as required.
Hence, we'd round of 603.97 to get 604MB.
So, let’s delete the created partition “/dev/sdb1” and re-create with 604MB size. This may not be the correct size. NOTE: Please don’t run mkfs.ext4 on the newly created partition.
<-> Yes, files are found.
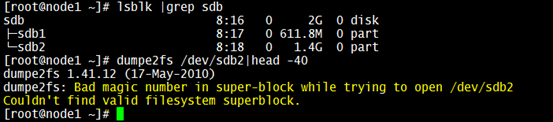
Same way, let’s create second partition ‘/dev/sdb2’ and check if we could mount it to get data. So, at first I had created second partition with complete left out space in “sdb” and tried to find out “Block count” & “Block size”, but received an error as shown:
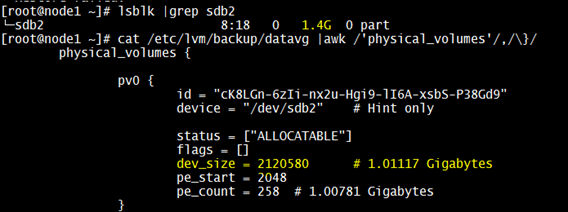
So, let’s check if “/dev/sdb2” was being used as a physical volume for a volume group. This can be searched in “/etc/lvm/backup” folder since system would create a file with name of the volume group with all details after recent lvm operation.

Yes, that confirms that this device “/dev/sdb2” was used as physical volume for creating a volume group “datavg”. So, let’s get more details using the file “/etc/lvm/backup/datavg”.

We know that we could run “vgcfgrestore” command to get back the metadata of the volume group “datavg”, so let’s see if this works now:

The restore of the "datavg" failed and error is pointing to the physical volume being not found. So, let’s verify the size of this PV in the lvm backup file and also the actual size:

Step 4: Mount the devices and check if data exists. If there is a volume group involved, then need to restore using “vgcfgrestore” command.

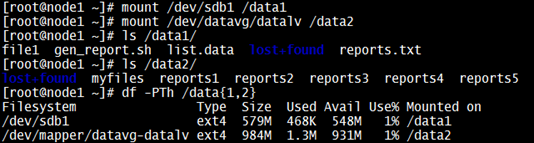
Yes, we got the data back for ‘/dev/sdb1’ device.
Since, we know that the device ‘/dev/sdb2’ was used as a physical volume for the volume group “datavg”, let’s run the “vgcfgrestore” and check now.

Yes, we are successful! That has restored the vg ‘datavg’. Now, let’s try to mount it and check if we could get back the data. Since the ‘datavg’ is not yet active, we’d need to run another command to get activated as shown:

That's it… we got our data back !!!
From “Step 2” we came to know that the “Block count” & “Block size” are as below:
Block count: 154617
Block size: 4096
So, let’s multiply both and see the total we get in bytes which is “633311232”. Since this value is in bytes, we’d need to convert this into further down into Kilo Bytes (KB), Mega Bytes (MB), Giga Bytes (GB), Tera Bytes (TB)..etc., as required.
633311232 bytes == 618468 KB == 603.97265625 MB
Hence, we'd round of 603.97 to get 604MB.
So, let’s delete the created partition “/dev/sdb1” and re-create with 604MB size. This may not be the correct size. NOTE: Please don’t run mkfs.ext4 on the newly created partition.
Mount back the created partition and check if data exists:
<-> Yes, files are found.
Same way, let’s create second partition ‘/dev/sdb2’ and check if we could mount it to get data. So, at first I had created second partition with complete left out space in “sdb” and tried to find out “Block count” & “Block size”, but received an error as shown:
So, let’s check if “/dev/sdb2” was being used as a physical volume for a volume group. This can be searched in “/etc/lvm/backup” folder since system would create a file with name of the volume group with all details after recent lvm operation.
Yes, that confirms that this device “/dev/sdb2” was used as physical volume for creating a volume group “datavg”. So, let’s get more details using the file “/etc/lvm/backup/datavg”.
We know that we could run “vgcfgrestore” command to get back the metadata of the volume group “datavg”, so let’s see if this works now:
The restore of the "datavg" failed and error is pointing to the physical volume being not found. So, let’s verify the size of this PV in the lvm backup file and also the actual size:
From the above output, it looks to me that the device of the size “1GB”, so let’s re-create the partition ‘/dev/sdb2’ with 1GB size and check if could restore the vg.
No, we are still unable to restore the "datavg". It is because, boundaries of the device ‘/dev/sdb2’ is not accurate. This is because the first partition ‘/dev/sdb1’ is created with bigger size. So, looking at the device size which we got after calculation using “Block count” and “Block size” for ‘sdb1’ sounds incorrect. So, the size that we’d decided “604MB” is not correct and it has to be of size “600M”. Generally, we’d know whenever a new partition gets created it would be rounded off, so in this case we could say it should be of size “600M”.
Let’s restructure the partition layout now. We’d need to create first partition ‘/dev/sdb1’ with 600M size and second one ‘/dev/sdb2’ with 1GB size.
Step 4: Mount the devices and check if data exists. If there is a volume group involved, then need to restore using “vgcfgrestore” command.
From the previous steps, we found that there needs to be two partitions ‘/dev/sdb1’ & ‘/dev/sdb2’ to be created with sizes as described earlier.
I. Mount & Verify ‘/dev/sdb1’:
So, let’s mount ‘/dev/sdb1’ on ‘/data1’ and check if files/data is available.
Yes, we got the data back for ‘/dev/sdb1’ device.
II. Run ‘vgcfgrestore’ command and verify:
Since, we know that the device ‘/dev/sdb2’ was used as a physical volume for the volume group “datavg”, let’s run the “vgcfgrestore” and check now.
Yes, we are successful! That has restored the vg ‘datavg’. Now, let’s try to mount it and check if we could get back the data. Since the ‘datavg’ is not yet active, we’d need to run another command to get activated as shown:
That's it… we got our data back !!!
NOTE: As we’ve noticed that this approach needs a little bit trial/error efforts in identifying actual size of partitions. Also, we knew that there were only 2 partitions created on device ‘/dev/sdb’, in case there are more partitions then we’d need to continue as we did before.
12 comments:
Hello, just wanted to mention, I liked this blog post.
It was helpful. Keep on posting!
Saved as a favorite, I like your site!
Excellent article. I'm dealing with many of these
issues as well..
An outstanding share! I have just forwarded
this onto a co-worker who has been doing a little research on this.
And he actually ordered me breakfast because I stumbled upon it for
him... lol. So let me reword this.... Thank YOU for the
meal!! But yeah, thanx for spending some time to talk about this issue here on your blog.
Superb post however , I was wondering if you could write a litte more on this topic?
I'd be very grateful if you could elaborate a little bit
more. Many thanks!
Hello,
You may send an email to SimplyLinuxFAQ@gmail.com with what information you need more info. Also better you comment using your name instead as Anonymous.
Thanks!
Thanks for some other informative site. Where else may just I am getting that kind of info written in such an ideal means?
I have a undertaking that I am simply now running on, and I've been on the look out for such information.
What's Happening i am new to this, I stumbled upon this I have found It positively useful and it has aided me out loads.
I'm hoping to contribute & assist different customers like its helped me.
Good job.
This article is truly a pleasant one it assists new net users,
who are wishing in favor of blogging.
Thank you for another wonderful post. The place
else may just anybody get that kind of info in such an ideal means of writing?
I've a presentation subsequent week, and I am at the
look for such information.
Great article, but you did not mention which method/command you used to create unformatted partition. It'd be a great help if you can add this to your article because a lot of people still confused and some gui apps format partition as they create. Thanks
what is the method used to create the partition???
Post a Comment