
We get to see “Error 15” or “Error 17” when the ‘/boot’ file system is corrupted, so system fails to boot up. This is mainly because of primary boot loader files missing or not found. It could also be possible that the ‘/boot’ file system has been overwritten or formatted by mistake.


In some cases, when there is a problem with files such as ‘vmlinuz-*’ then system would show up an error message “Error 15: File not found”. In such a case, system would go past the Stage 1 and Stage 1.5 boot process and even shows the time counter screen, however, fails to load kernel because of missing or corrupted kernel files (vmlinuz-* or related files). This may also lead to “Kernel Panic” error as shown below:

[ If there is any problem with ‘grub.conf’ file then system would drop into ‘grub’ prompt. If this is the ONLY problem then system could be restored by sourcing kernel image, initramfs image files. This is not complicated, hence, I’d not be taking this into consideration here ]
Let us see how to fix this issue and bring back the system into live. In this case, it is required to boot the system into rescue mode and recover failed file system. The steps/procedure document here are pertaining to RHEL 6/5. However, wherever possible I've documented the changes required on RHEL 7 and above systems.
Here is the step-by-step procedure to fix this issue.
Step 1: Boot Into Rescue Environment
Boot into rescue mode to check for boot files and file system. So, mount an ISO image or boot disc or CD/DVD (whatever possible options) and make it as primary boot device. Reboot the system and one should get the below screen, (I’ve used RHEL6.9 ISO image file):

Select ‘Rescue Installed System’ → set language as ‘English’ → let the keyboard type be default to set to ‘us’ and then click/select ‘Ok’ → select ‘No’ to ‘Setup Networking’ → select ‘Continue’ → click ‘Ok’ when rescue image was able to detect root file system and mount under ‘/mnt/sysimage’.

Click on ‘Ok’ button and then select ‘Shell Start Shell’ option to get into Rescue Shell Mode. At the shell prompt run the command chroot /mnt/sysimage to get into actual root filesystem.
Now, our system was successfully able to mount root file system under /mnt/sysimage as shown below:

Step 2: Detect / (root) & /boot File System and Backend Block Devices
As we could notice here, the root file system is on a lvm 'lv_root' which is on the volume group ‘VolGroup’. So, let us run the ‘vgs’ and ‘lvs’ commands which would fetch out those details.
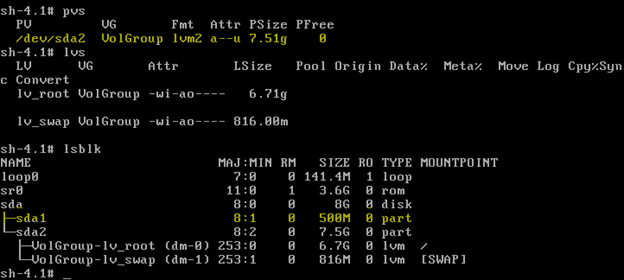
As per the above output, there is one volume group named ‘VolGroup’ which consists of two logical volumes (lv) named as ‘lv_root’ & ‘lv_swap’. There are two disk partitions noticed and they are : ‘/dev/sda1’ & ‘/dev/sda2’.
The ‘/dev/sda2’ is the block device being used for the volume group ‘VolGroup’ which is where the root file ( / ) system & swap resides.
At this stage, we’d need to find out which is the boot device? Let us see if there is ‘/etc/fstab’ file available which could tell us about the block devices being used for mounting and various mount points as well:

As per the above output, it says that one marked in ‘yellow’ color with a UUID is the block device being used for ‘/boot’. Let us try to find out which is that block device using ‘findfs’ command. We need to pass the UUID to ‘findfs’ command in order to find the block device as shown below:

The system was unable to find out the block device with that UUID. This could be because the UUID of the boot device might have changed or file system itself corrupted.
We could easily make it out that the block device ‘/dev/sda1’ would be the boot device here (in most cases excluding boot from SAN cases) . The other one which is ‘/dev/sda2’ is the block device being used for the vg ‘VolGroup’.
Step 3: Try To Fix /dev/sda1 Device
Let’s check and see if we can mount ‘/dev/sda1’.
First, I ran # mount -a (mount all devices as listed in /etc/fstab file) which failed with an error saying special device with UUID does not exists. Then, I tried to mount manually using the command ‘mount /dev/sda1 /boot’, which again failed as shown below:

These error messages strongly indicates that the file system is corrupted or damaged. As a last resort, one could run file system check using the command " # e2fsck -f -y /dev/sda1 " on the corresponding device and see if that helps as shown here ( need to use xfs_repair command in case of RHEL 7 and above where the file system is XFS) :

The above error message says that there is a problem with ‘super-block’ of the device. Hence, it is prompting to check with backup superblocks. So, let us check if we can find out backup superblocks of this device. Here, we could use ‘mke2fs’ command as shown below:

Now, let us run the ‘e2fsck’ command using backup superblock and see if that helps. The command to be executed here is: " # e2fsck -b 8193 /dev/sda1 " as shown below:

When used with the first backup superblock it failed as shown above. Hence, I tried the command using the last backup superblock which is 401409 and this is what happened ( to avoid multiple prompts asking for confirmation, run the command with -f -y parameters which would force and automatically chooses yes to all confirmation prompts):

As per the above message, it looks that the journal is corrupted and hence, we could see many error messages. The file system is checked for all such errors in superblock and it would try to rectify those. Once it has fixed all those errors, we could get the screen where it says file “system was modified” as shown below:

Step 4: Check & Mount /dev/sda1 (/boot)
Now, let’s check if we could mount ‘/dev/sda1’ and find out if boot files are there. When I mount ‘/dev/sda1’ on ‘/boot’, I could not see any files over there except ‘lost+found’ directory. In this directory, we could get to see the orphan files.

There is a folder with some number over there. So, let’s find out what is there inside that folder now.
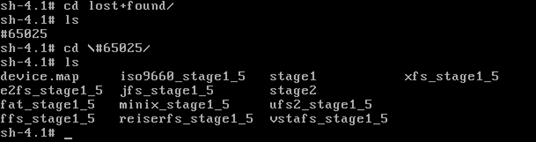
These files are the boot files, which should reside under ‘/boot/grub’ folder. Let’s check it and move them to ‘/boot/grub’ folder now:

I’ve moved all those files into ‘/boot/grub’ folder by creating this folder and removed ‘lost+found’ folder.

Step 5: Lets Restore Missing Files In /boot
Ideally, under ‘/boot’ we should get to see ‘initramfs-*’, ‘vmlinuz-*’, and many other files which are installed by the kernel package. At this stage, we would need to install the kernel package since these files are missing.
I’ve mounted ‘cdrom’ on ‘/media’ mount point here. If this ISO image file or disc not mounted then mount it using the command ‘mount /dev/cdrom /media’ (your CDROM device may be different). Once, the ISO image or CD/DVD image is available, need to run ‘rpm’ command to install the required kernel package (please check and install correct kernel package) as shown below:

It looks that it has installed the kernel package. So, let's check out if the required files are present under ‘/boot’. Yes, I could see the files ‘initramfs-*’, ‘vmlinuz-*’ etc., which are back now and that looks good.

Let’s re-create the initrd/initramfs image file so that the necessary drivers to boot the system are available using the command 'dracut' as shown below:
# dracut -f -v /boot/initramfs-2.6.32-696.el6.x86_64.img $(uname –r)
Once the command completes, we could get to see a message similar to the one below:

As we could see that the file size of ‘/boot/initramfs-2.6.32-696.el6.x86_64.img’ has changed and it is a bit bigger now compared with the earlier one when kernel package got installed forcefully.
At this stage, we need to create ‘/boot/grub/grub.conf’ (/boot/grub2/grub.cfg in case of RHEL 7 and above) file since it is not there. One could get the reference from ‘grub.conf’ file which is available in the ISO image file.

So, let’s copy this file from ‘/media/isolinux/’ (the ISO image is mounted on /media) to ‘/boot/grub’ folder and then make the required changes. One could refer to the ‘/boot/grub/grub.conf’ file on a working system to understand how it should be. This file was on read-only mode when I copied, hence, I had changed its attributes:

I’ve created a simple ‘grub.conf’ file as shown below (later we could add more parameters as required, I mean once the system boots up successfully):

Step 6: Fix /etc/fstab File Entry & Reboot
We’ve made all most all changes required to boot the system up. However, may need to modify ‘/etc/fstab’ to add the new UUID of the device ‘/dev/sda1’.
First, let's check if the UUID of the device '/dev/sda1' got changed or not. Since it has got changed, need to add the new UUID to the file '/etc/fstab', otherwise, not. So, let's comment out the earlier ‘/boot’ device entry and add the new UUID of ‘/dev/sda1’ one as shown below (to find out the UUID run the command ‘blkid /dev/sda1’ ):

Now, let’s exit the shell and see if the system boots fine. Need to type ‘exit’ and hit the Enter key twice to come out of the rescue shell prompt and then select ‘reboot’.
* * * *……. Yes, system is booting up now!

There are some errors noticed which are okay at this stage to ignore. The first error was about CDROM device not found which could be ignored at this stage and we could fix this later. There is a warning message about SELinux re-labeling, which is usual since the /boot file system is modified and it is expected.

Once SELinux re-labeling gets finished, system would reboot and starts loading and get the login screen:

Success!!! The system is up now.

3 comments:
Very easy and knowledge full.
Nicely documented.., sometimes fixing superblock will create some issues..
In parallel we can try some live CD to boot and fix those superblock n fsck issues
explanation is awesome, Thank you
Post a Comment